The Sidewinder X2 comes with the Marlin 2.x firmware, installed on its “Artillery_Ruby” Mainboard. This article shows you one easy way how you can replace Marlin by Klipper as an alternative Firmware on your Sidewinder X2. Be aware, that your installed touch display, usb and sd card slot is unusable with klipper, because the way they are work and connected is not compatible to klipper. On my printer, I decided to disconnect and replace them by dummy prints, but you don’t have to.
Caution
Do it only if you feel experienced enough. Be aware that you do it at your own risk and that you will probably lose the Artillery’s warranty. I am not responsible for damages of any kind.
Preconditions
- An Artillery Sidewinder X2, unmodified hardware and with Artillery Ruby V1.2 mainboard
- A Raspberry PI (Zero W, 3B+, 4) or similar compatible boards with SD card, power supply, usb connection to your printer
- A working pc to flash the PI, and as a remote SSH console to it
- The will to open your printer (and potential loss of warranty)
- Some experience with Linux and bash console
Install MainsailOS and build Klipper firmware
Basic install and configure Mainsail
- Flash a SD card for your Raspberry with MainsailOS. It’s a prepared Raspberry PI OS Lite a modern software stack to control your printer. The frontend in this case is by default Mainsail. It’s similar to OctoPrint but more modern and to use with Klipper driven printers only.
- Follow the official MainsailOS installation guide. There is also simple article on All3DP.
- On the documentation page Klipper setup you need a basic printer.cfg that tells Klipper all about your connected printer hardware. In Marlin, this configurations are in Configuration.h and Configuration_adv.h and have to be recompiled on any change. In Klipper, this is just a config file and one of the benefits is, you don’t have to recompile the whole firmware on changes. There are a lot of example configs the the klipper repository but not yet for the Artillery Sidewinder X2.
- But you have a lucky day. I created a printer.cfg for the Sidewinder X2. Download it here: printer.cfg. Meanwhile, my Klipper pull request got merged into the official Klipper examples. So the Sidewinder X2 example file is here.
Flash klipper to your printer mainboard
As mentioned under caution - be sure, you know what you are doing. I never tried to switch back to Marlin. Normally, it should be no problem, but I never tried till the time of writing this (comments are welcome).
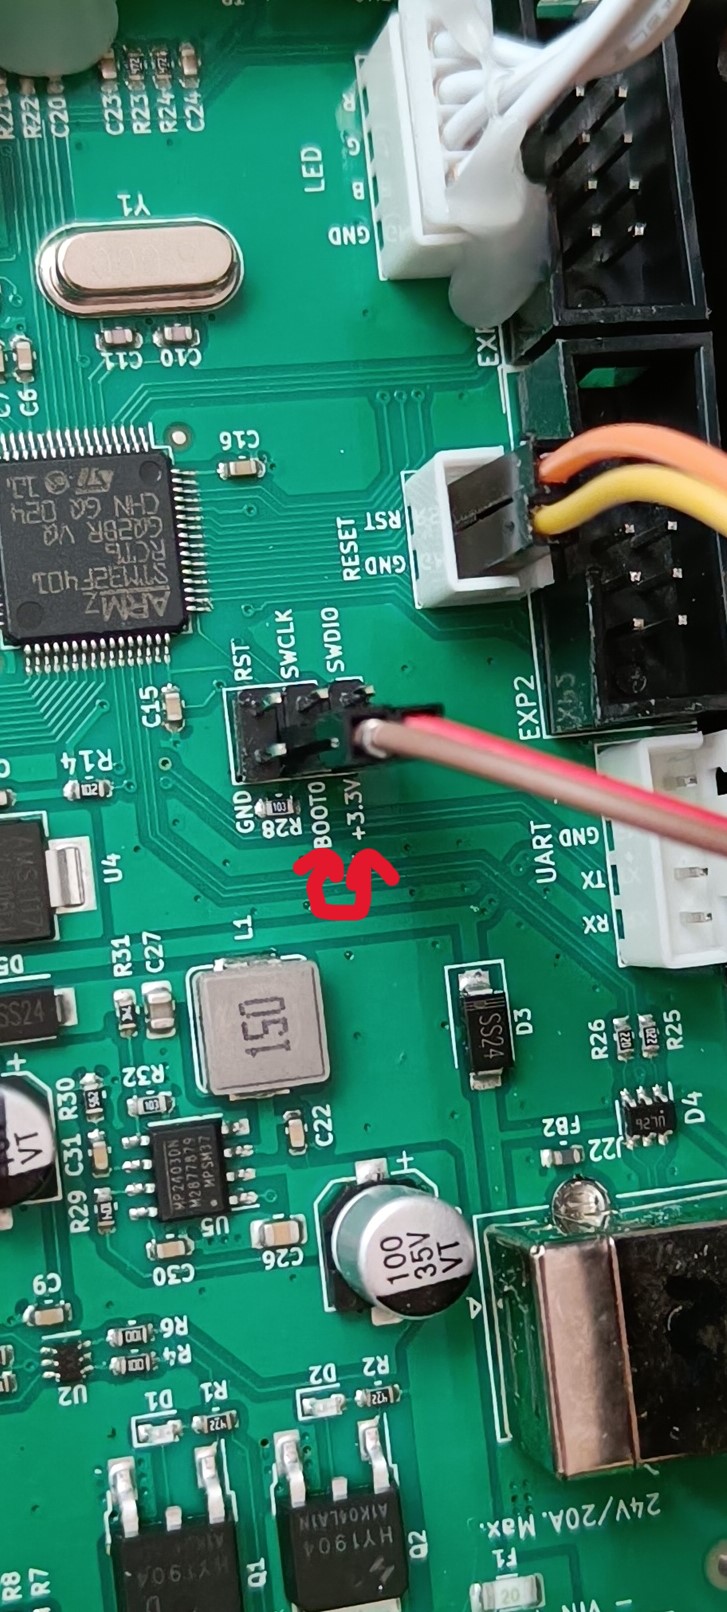
You have to bridge two pins, to enable the “flash mode” of your mainboard. Open your printer (screws on the bottom). Connect the pins BOOT0 and +3.3V with a jumper or a breadboard cable. (You have to remove it after flashing!).

Connect your Raspberry PI via USB cable to your Artillery Sidewinder X2. Then power on your printer and your Raspberry. Connect to it by using SSH or connect keyboard and monitor to it. Login to console by default with user: pi, password: raspberry.
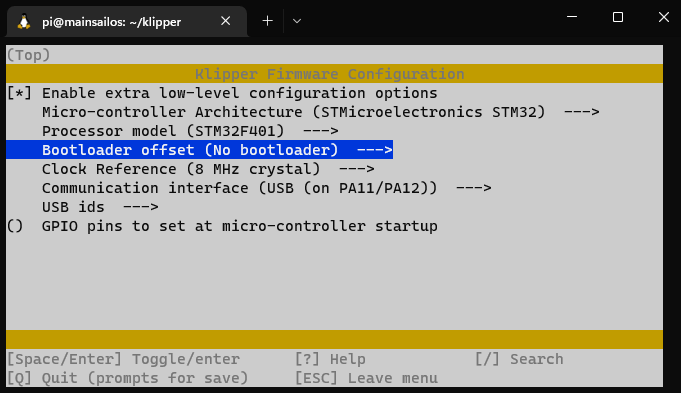
Before flash, you have to configure and build your firmware for your printer once. Open your PI console and type
cd ~/klipper/
make menuconfig
In the opened configuration-menu change only the following:
- Set Micro-controller Architecture to STMicroelectronics STM32
- Set Processor model to STM32F401
- Set Bootloader offset to No bootloader
- Quit (Q) and Save (Y)

Build the firmware with
makeFlash the build firmware with
make flash FLASH_DEVICE=/dev/serial/by-id/usb-Klipper_stm32f401xc_4F006F000351383532393535-if00In your case maybe the device has another id/path. Adapt the command in that case. As mentioned under caution - be sure, you know what you are doing.
Read more details in official Klipper documentation: Building and flashing the micro-controller
Remove the flash mode jumper you set above
Reboot your Raspberry, follow the mainsail and klipper configuration checks.
- Follow the Klipper config checks. Ignore OctoPrint, because your setup is with Mainsail instead.
- Especially make sure some values are adapted and calibrated for your individual printer
- Especially the z-offset
- And the extruder rotation_distance (Measure it without an installed Nozzle!)
- Calibrate PID values for heat-bed and extruder nozzle
- Don’t forget to setup/adapt your slicers begin-/end g-code
Your done and ready to get in touch with Klipper and it’s endless possibilities. It takes a time to understand the context.
Preview to future posts
If I got some time, be excited about the topics
- A useful set of G-code macros (filament runout, pause resume, start-stop print). Post is online: Must-have Mainsail, Klipper and Cura slicer configuration with Artillery Sidewinder X2
- Reenable the stock filament runout sensor, Post is online: Reenable and configure the filament-runout sensor with Klipper
- Install an ADXL345 acceleration sensor and calibrate klipper Resonance Compensation
- Remove and replace USB, SD card and the useless touch display
Conclusion
Hope I could help you with the painful start, doing the initial basic configuration for your Artillery Sidewinder X2.
For further steps and more details it is always a very good idea to walk through the very good official documentations
Please leave a comment if there is something wrong or missing. Or if you have any questions. Have fun!
If you enjoyed this article and would like to support my work, feel free to buy me a coffee! Your support helps me continue creating content. Thank you!
