Klipper has the powerful possibility to add G-Code macros or even overwrite existing G-Codes. By default, Klipper knows only about standard G-Codes (Described in Klipper documentation). You have to configure everything that goes beyond. Scenarios are filament runout, pause and resume print, filament change, cancel objects etc. In case of the Artillery Sidewinder X2, you can also add some macros what should happen with the Neopixel LED on your extruder.
The basic idea is often not mine. Instead, I have gathered examples from documentation and adapted them to the Sidewinder X2 and my needs. My advice is that you also start this way. But you can also just copy mine for your first steps with your Sidewinder.
Basic mainsail setup
For the basic setup of Klipper with Mainsail, you should start to configure your machine. Setup the printer, mainsail and add some basic must have macros.
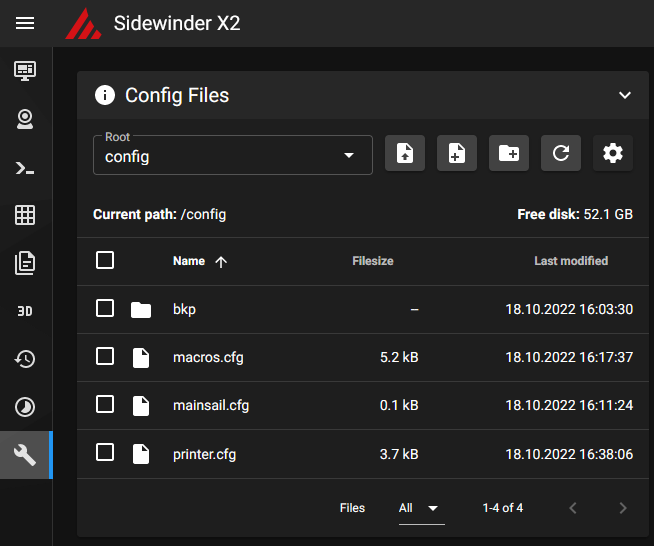
- Login to your Mainsail webpage on your RaspberryPI or where ever you run it.
- Navigate to

- I suggest to split your configuration in files according to their content. First add/edit the following 3 config files.
- The printer.cfg contains all configuration about your Sidewinder X2 printer hardware. It also includes a reference the next two config files.
- The macros.cfg that contains basic g-code macros for start, end, pause, resume and cancel the print. In my case there also some helper scripts for example to enable the extruder LED.
- And lastly the mainsail.cfg. It configures the basic features in combination with the used Mainsail UI. For example to enable the virtual sd-card, exclude objects or pause and resume prints.
Printer.cfg
The printer.cfg file represents the printer hardware. In this case the stock Artillery Sidewinder X2, sold in 2022. I already introduced the printer.cfg in my last blog post. Meanwhile I created a merge request to the official klipper repository. So it will be only a matter of some days, that they include my config into the official Klipper repository as an example printer configuration.
Update The basic printer.cfg example for Artillery Sidewinder X2 is merged into official Klipper3d repository. Find it here
In one of my next posts, I will show you how we can add ADXL345 support to enable the automatic an precise calibration of the resonance compensation.
See more about the configuration of your hardware in the excellent Klipper configuration reference.
Don’t forget to calibrate at least your z_offset carefully before printing. If not, you could damage your printer heatbed. See bed leveling for more instructions.
Mainsail.cfg
The mainsail.cfg file represents the minimum configuration for Mainsail. And it is at this point basically the result of Mainsail required configuration page.
In contrast to their guide, we moved the g_code macros to an additional macros.cfg file.
Macros.cfg
The macros.cfg file contains all our basic g-code macros. That includes the START_PRINT, END_PRINT, PRIME_LINE, PRESENT_PRINT, PAUSE, RESUME and CANCEL_PRINT macro. In Addition I added some very basic macros to enable/set/disable the led under the extruder (ELED_ON, SET_ELED and ELED_OFF).
Finally
If you done everything right, Mainsail does not show errors or warnings on it’s dashboard. Mainsail is ready to print.
But before printing, make sure that you read the following section.
Basic slicer setup (Cura)
I will show you on the example of the Ultimaker Cura slicer how to setup your Sidewinder X2 - especially the start g-code and end g-code. Of course you can adapt this to the other great slicers out there.
If you used Marlin before, you don’t have to change the printer and printhead settings. If not, the easiest way for an initial configuration is to add the an Artillery Sidewinder X1 as your printer and rename it to X2. It has the same settings.
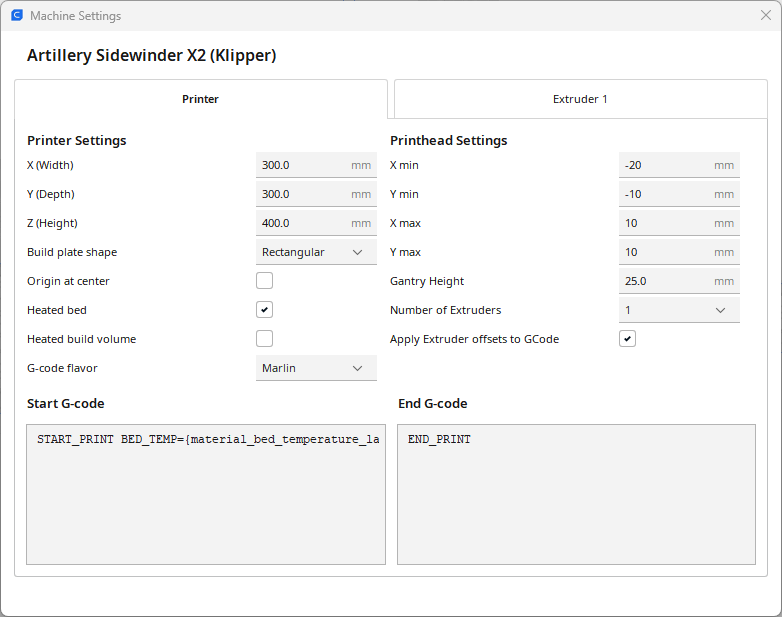
Whats new with Klipper? As you can configure your own g-code macros in Klipper, it’s a good practice to replace the default Cura Start G-code and End G-code scripts by your own G-code macros. If you use my macros.cfg above, all the start and end logic is defined there.

Just call the START_PRINT and the END_PRINT G-code macros in your Cura machine settings Start-G-code and End-G-Code sections as seen in the screenshot above.
For copy and paste:
Start G-code
START_PRINT BED_TEMP={material_bed_temperature_layer_0} EXTRUDER_TEMP={material_print_temperature_layer_0}
It calls the ‘START_PRINT’ macro from macros.cfg with the in Cura configured material print temperatures.
End G-code
END_PRINT
It calls the ‘END_PRINT’ macro from macros.cfg.
Conclusion
If you followed the steps, make sure, you calibrated your z_offset and your bed mesh. And you are ready to print your first object with Klipper.
For further steps and more details it is always a very good idea to walk through the very good official documentations
If you also like to reenable the stock filament runout sensor a new post about that is online: Reenable and configure the filament-runout sensor with Klipper
Please leave a comment if there is something wrong or missing. Or if you have any questions. Have fun!
If you enjoyed this article and would like to support my work, feel free to buy me a coffee! Your support helps me continue creating content. Thank you!
